This is more of a fun tweak than it is useful. Go to run, type regedit press ok.
When that comes up go to HKEY_CURRENT_USER>Control Panel>Desktop
Now find the orginalwallpaper, right click and select modify.
In the text box type the path to the file you want to be your orginal desktop wallpaper.
Monday, December 31, 2007
Saturday, December 22, 2007
CHANGING OEM REGISTRATIONS (HP)
Have you used someone's new Hewlet Packard with their OEM version of Windows XP? You've seen that HP has their own icon in the Start Menu, underneath Run, that goes to their Help Site. Now, you can have your icon that does anything you want (website, program, etc) and says anything you want. Basically, you are "branding" Windows XP (Home or Pro), great for if you are a computer builder and sell them, or you just want to make Windows XP your own. It involves Regedit.
1. Start up Notepad and creat a new registry file (*.reg) and copy and paste the following into it:
Windows Registry Editor Version 5.00
[HKEY_CLASSES_ROOT\CLSID\{2559a1f6-21d7-11d4-bdaf-00c04f60b9f0}]
@="YOUR COMPANY NAME"
[HKEY_CLASSES_ROOT\CLSID\{2559a1f6-21d7-11d4-bdaf-00c04f60b9f0}\DefaultIcon]
@="YOUR ICON HERE"
00,79,00,73,00,74,00,65,00,6d,00,33,00,32,00,5c,00 ,68,00,70,00,6c,00,69,00,\
6e,00,6b,00,2e,00,69,00,63,00,6f,00,00,00
[HKEY_CLASSES_ROOT\CLSID\{2559a1f6-21d7-11d4-bdaf-00c04f60b9f0}\InProcServer32]
@=hex(2):25,00,53,00,79,00,73,00,74,00,65,00,6d,00 ,52,00,6f,00,6f,00,74,00,25,\
00,5c,00,73,00,79,00,73,00,74,00,65,00,6d,00,33,00 ,32,00,5c,00,73,00,68,00,\
64,00,6f,00,63,00,76,00,77,00,2e,00,64,00,6c,00,6c ,00,00,00
"ThreadingModel"="Apartment"
[HKEY_CLASSES_ROOT\CLSID\{2559a1f6-21d7-11d4-bdaf-00c04f60b9f0}\Instance]
"CLSID"="{3f454f0e-42ae-4d7c-8ea3-328250d6e272}"
[HKEY_CLASSES_ROOT\CLSID\{2559a1f6-21d7-11d4-bdaf-00c04f60b9f0}\Instance\InitPropertyBag]
"CLSID"="{13709620-C279-11CE-A49E-444553540000}"
"method"="ShellExecute"
"Command"="YOUR TITLE HERE"
"Param1"="YOUR FUNCTION HERE"
[HKEY_CLASSES_ROOT\CLSID\{2559a1f6-21d7-11d4-bdaf-00c04f60b9f0}\shellex]
[HKEY_CLASSES_ROOT\CLSID\{2559a1f6-21d7-11d4-bdaf-00c04f60b9f0}\shellex\ContextMenuHandlers]
[HKEY_CLASSES_ROOT\CLSID\{2559a1f6-21d7-11d4-bdaf-00c04f60b9f0}\shellex\ContextMenuHandlers\{2559a1f 6-21d7-11d4-bdaf-00c04f60b9f0}]
@=""
[HKEY_CLASSES_ROOT\CLSID\{2559a1f6-21d7-11d4-bdaf-00c04f60b9f0}\shellex\MayChangeDefaultMenu]
@=""
[HKEY_CLASSES_ROOT\CLSID\{2559a1f6-21d7-11d4-bdaf-00c04f60b9f0}\ShellFolder]
"Attributes"=dword:00000000
2. Edit where it says YOUR ICON HERE to a path to an icon (ex. c:\\icon.ico), it must be 24x24 pixels and in *.ico format. Use double back slash for path names.
3. Edit both places where it says YOUR TITLE HERE to what you want it to say in the Start Menu (ex. Elranzer Homepage).
4. Edit where it says YOUR FUNCTION here to what you want it to do when you click it, it can be anything... your website, a local HTML document, a program, a Windows funtion, whatever your imagination can provide (ex. http://www.shareodie.com/).
5. Save this file as brand.reg, double-click it to enterin your information, and refresh Explorer (log off/on) to see it in the Start Menu!! This works in both Home and Professional (and probably 64-Bit Professional) Editions!
Sunday, December 16, 2007
EASY WAY TO ADD THE ADMINISTRATOR USER TO THE WELCOME SCREEN
Start the Registry Editor Go to:
HKEY_LOCAL_MACHINE \ SOFTWARE \ Microsoft \ Windows NT \ CurrentVersion \ Winlogon \ SpecialAccounts \ UserList \
Right-click an empty space in the right pane and select New > DWORD Value Name the new value Administrator. Double-click this new value, and enter 1 as it's Value data. Close the registry editor and restart.
Wednesday, November 7, 2007
ANOTHER WAY TO FIX IEXPLORER 6 SLOW PAGES LOADED.
Here's an easier way to get to index.dat file as addresse in another tweak submitted here.
1. click on Internet Explorer
2. go to to your root dir (usually C
3. open Documents and Settings folder
4. open "your username folder"
5. open UserData
6. **close IE if you have it open**
rename index.dat to index.old
logoff and log back on (don't need to restart) open up IE and go to a web page or site that always seemed to load slowly. It should load a lot more quickly now. NOTE. Always rename or backup .dat or other system files before deleting.
Saturday, October 27, 2007
IPV6 INSTALLATION FOR WINDOWS XP.
This protocol is destined to replace the Internet Protocal Version 4 used by Internet Explorer it uses hexadecimal ip addresses instead of decimal example (decimal ip 62.98.231.67) (hexadecimal IP 2001:6b8:0:400::70c)
To install To install the IPv6 Protocol for Windows XP:
Log on to the computer running Windows XP with a user account that has local administrator privileges. Open a command prompt. From the Windows XP desktop, click Start, point to Programs, point to Accessories, and then click Command Prompt. At the command prompt, type: ipv6 install
For more information on IPv6, visit the site below:
http://www.microsoft.com/windowsxp/pro/techinf o/administration/ipv6/default.asp
Saturday, October 20, 2007
ALLOW MORE THAN 2 SIMULTANEOUS DOWNLOADS ON IEXPLORER 6.
This is to increase the the number of max downloads to 10.
1. Start Registry Editor (Regedt32.exe).
2. Locate the following key in the registry:
HKEY_CURRENT_USER\Software\Microsoft\Windows\Curre ntVersion\Internet Settings
3. On the Edit menu, click Add Value , and then add the following registry values:
"MaxConnectionsPer1_0Server"=Dword:0000000a
"MaxConnectionsPerServer"=Dword:0000000a
4. Quit Registry Editor.
Sunday, October 14, 2007
FIX IE 6 SLOWDOWNS AND HANGS
1. Open a command prompt window on the desktop (Start/Run/command).
2. Exit IE and Windows Explorer (iexplore.exe and explorer.exe, respectively, in Task Manager, i.e - Ctrl-Alt-Del/Task Manager/Processes/End Process for each).
3. Use the following command exactly from your command prompt window to delete the corrupt file:
C:\>del "%systemdrive%\Documents and Settings\%username%\Local
Settings\Temporary Internet Files\Content.IE5\index.dat"
4. Restart Windows Explorer with Task Manager (Ctrl-Alt-Del/Task Manager/Applications/New Task/Browse/C:\Windows\explorer.exe[or your path]) or Shutdown/Restart the computer from Task Manager.
Wednesday, October 10, 2007
SPEED UP DETAILED VIEW IN WINDOWS EXPLORER
Hello, Im back... once again I will teach you some tips on how really to be a computer-geek.
If you like to view your files in Windows Explorer using the "Details" view here is a tweak to speed up the listing of file attributes: Viewing files in Windows Explorer using the "Details" mode shows various attributes associated with each file shown. Some of these must be retrieved from the individual files when you click on the directory for viewing. For a directory with numerous and relatively large files (such as a folder in which one stores media, eg: *.mp3's, *.avi's etc.)
Windows Explorer lags as it reads through each one. Here's how to disable viewing of unwanted attributes and speed up file browsing:
1. Open Windows Explorer
2. Navigate to the folder which you wish to optimize.
3. In "Details" mode right click the bar at the top which displays the names of the attribute columns.
4. Uncheck any that are unwanted/unneeded.
Explorer will apply your preferences immediately, and longs lists of unnecessary attributes will not be displayed. Likewise, one may choose to display any information which is regarded as needed, getting more out of Explorer.
Enjoy! I hope this can help.
Sunday, October 7, 2007
SPEED UP BROWSING WITH DNS CATCH
When you connect to a web site your computer sends information back and forth, this is obvious. Some of this information deals with resolving the site name to an IP address, the stuff that tcp/ip really deals with, not words. This is DNS information and is used so that you will not need to ask for the site location each and every time you visit the site. Although WinXP and win2000 has a pretty efficient DNS cache, you can increase its overall performance by increasing its size. You can do this with the registry entries below:
------ copy and paste---------
Windows Registry Editor Version 5.00
[HKEY_LOCAL_MACHINE\SYSTEM\CurrentControlSet\Servic es\Dnscache\Parameters]
"CacheHashTableBucketSize"=dword:00000001
"CacheHashTableSize"=dword:00000180
"MaxCacheEntryTtlLimit"=dword:0000fa00
"MaxSOACacheEntryTtlLimit"=dword:0000012d
************end copy and paste***********
make a new text file and rename it to dnscache.reg. Then copy and paste the above into it and save it. Then merge it into the registry.
Enjoy!!!
Friday, October 5, 2007
INTERNET EXPLORER LIGHTING-FAST STARTUP.
Isn't it annoying for you when you want to go to a new website, or any other site but your homepage, and you have to wait for your 'home' to load? This tweak tells Internet Explorer to simply 'run', without loading any webpages. (If you use a 'blank' page, that is still a page, and slows access. Notice the 'about:blank' in the address bar. The blank html page must still be loaded..). To load IE with 'nothing' [nothing is different than blank]:
1. Right-click on any shortcut you have to IE
[You should create a shortcut out of your desktop IE icon, and delete the original icon]
2. Click Properties
3. Add ' -nohome' [with a space before the dash] after the endquotes in the Target field.
4. Click OK
Fire up IE from your modified shortcut, and be amazed by how fast you are able to use IE!
INTERNET EXPLORER SPEED UP.
Edit your link to start Internet Explorer to have -nohome after it. For Example: "C:\Program Files\Internet Explorer\IEXPLORE.EXE" -nohome
This will load internet explorer very fast because it does not load a webpage while it is loading. If you want to go to your homepage after it is loaded, just click on the home button.
Thursday, September 27, 2007
REMOVING USERNAME IN THE START MENU
Open Registry Editor Then Go To : "HKEY_CURRENT_USER\Software\Microsoft\Windows\ Curr entVersion\Policies\Explorer".
On The Right, Make A New Entry With Right Click On Your Mouse Then Choose "New | DWORD Value" Change The Entry's Name Into "NoUserNameInStartMenu", Double Click In The New Entry And Fill The "Value Data" With "1". Press OK, Exit From The Registry Editor. Restart Your Computer.
On The Right, Make A New Entry With Right Click On Your Mouse Then Choose "New | DWORD Value" Change The Entry's Name Into "NoUserNameInStartMenu", Double Click In The New Entry And Fill The "Value Data" With "1". Press OK, Exit From The Registry Editor. Restart Your Computer.
Sunday, September 23, 2007
CONTROL PANEL ON THE DESKTOP
Have you heard that that Control Panel icon can be placed on the desktop? How to do it? just follow the methods below.
On The Desktop, Right Click Your Mouse Then Choose "New | Folder". Name The Folder As "ControlPanel. {21EC2020-3AEA-1069-A2DD-08002B30309D}" Without The "Quote Things. And Now You Can Access The Control Panel More Faster Then Before.
On The Desktop, Right Click Your Mouse Then Choose "New | Folder". Name The Folder As "ControlPanel. {21EC2020-3AEA-1069-A2DD-08002B30309D}" Without The "Quote Things. And Now You Can Access The Control Panel More Faster Then Before.
Thursday, September 20, 2007
RESTORING ACCESS TO CD ROM'S
If you removed CD Burning software, or for some other mystical reason, can not longer access your CD ROM's, in most cases following registry keys needs to be deleted: Locate and delete the UpperFilters and LowerFilters values under the following key in the registry:
HKEY_LOCAL_MACHINE\SYSTEM\CurrentControlSet\Contro l\Class\{4D36E965-E325-11CE-BFC1-08002BE10318}
HKEY_LOCAL_MACHINE\SYSTEM\CurrentControlSet\Contro l\Class\{4D36E965-E325-11CE-BFC1-08002BE10318}
Tuesday, September 18, 2007
RESTORING MEDIA PLAYER
To restore Windows Media Player insert the the XP CD into the CD drive (if it autostarts click exit). Open a command window and type the following :
rundll32.exe setupapi,InstallHinfSection InstallWMP7 132 c:\windows\inf\wmp.inf
rundll32.exe setupapi,InstallHinfSection InstallWMP7 132 c:\windows\inf\wmp.inf
Monday, September 17, 2007
DMA MODE ON IDE DEVICES VIEWS
Like Windows 2000, Windows XP also fails to set the DMA mode correctly for the IDE device designated as the slaves on the primary IDE and secondary IDE channels. Most CD-ROMS are capable of supporting DMA mode, but the default in XP is still PIO. Setting it to DMA won't make your CD-ROM faster, but it will consume less CPU cycles. Here's how:
1. Open the Device Manager. One way to do that is to right click on "My Computer", select the Hardware tab, and Select Device Manager.
2. Expand "IDE ATA/ATAPI Controllers" and double-click on "Primary IDE Channel"
3. Under the "Advanced Settings" tab, check the "Device 1" setting. More than likely, your current transfer mode is set to PIO.
4. Set it to "DMA if available".
Repeat the step for the "Secondary IDE Channel" if you have devices attached to it. Reboot.
hope it helps you.
Saturday, September 15, 2007
HOW TO DISABLE THE 'UNSIGNED DRIVER' DIALOGS
This method will disable the screen which keeps popping up when you try to install 'digitally unsigned drivers'. Normally you can choose to continue the install anyways, but I have had situations where you cannot continue the install.. very annoying.. This is how to fix it:
Click Start - Run
then type: gpedit.msc
then hit enter.
Browse the folder tree to the following location:
User Configuration - Administrative Templates - System
now right-click Code signing for Device drivers and select Properties.
On the Settings tab, either select
- enable, and then select ignore from the appearing listbox..
- or click the disable option. Click apply and Ok and your set!
Alternatively especially for XP Home users:
Open "System" properties (Windows key + pause or Right click 'My Computer' - properties or Control Panel - System).On the Hardware tab click the "Driver Signing" button. In the dialogue that comes up choose "Ignore" to install the new driver anyway.
Thursday, September 13, 2007
How stop the noise in copying audio CD?
When you are using 3rd party burning software (eg, Roxio, Nero Burning Rom) to copy audio CD,some noise may be heard at the end of each track. To prevent this,try the following steps:
1. Enter System Properties\device manager
2. Select IDE ATA/ATAPI controllers
3. Double click on thee CD writer IDE channel
4. Select advance setting
5. Change the transfer mode to 'PIO Only'
6. Restart Computer
Hope that helps.
1. Enter System Properties\device manager
2. Select IDE ATA/ATAPI controllers
3. Double click on thee CD writer IDE channel
4. Select advance setting
5. Change the transfer mode to 'PIO Only'
6. Restart Computer
Hope that helps.
Saturday, September 8, 2007
Cool Tricks for Internet Browsers!!!
This is a cool trick you can try out on your browser. Paste the following code into the address bar when any website with images is loaded. You can use it on any other webpage,blog with pictures!
To stop the animation, just click on your browser's refresh button.
trick 1:
javascript:function Shw(n) {if (self.moveBy) {for (i = 35; i > 0; i--) {for (j = n; j > 0; j--) {self.moveBy(1,i);self.moveBy(i,0);self.moveBy(0,-i);self.moveBy(-i,0); } } }} Shw(6)
Press enter and watch your window's "shaking it". You can change the value of i if you wish :-)
trick 2:
javascript:R=0; x1=.1; y1=.05; x2=.25; y2=.24; x3=1.6; y3=.24; x4=300; y4=200; x5=300; y5=200; DI=document.getElementsByTagName("img"); DIL=DI.length; function A(){for(i=0; i-DIL; i++){DIS=DI[ i ].style; DIS.position='absolute'; DIS.left=(Math.sin(R*x1+i*x2+x3)*x4+x5)+"px"; DIS.top=(Math.cos(R*y1+i*y2+y3)*y4+y5)+"px"}R++}setInterval('A()',50); void(0);
trick 3:
javascript:R=0; x1=.1; y1=.05; x2=.25; y2=.24; x3=1.6;y3=.24; x4=300; y4=200; x5=300; y5=200; function mixit(){ DI2=document.getElementsByTagName("img"); DIL2=DI2.length; for(j=0; j-DIL; j++){DIS2=DI2[j].style; DIS2.zIndex=200-Math.floor(Math.random()*100+1);} } function fuckup(){DI=document.getElementsByTagName("img"); DIL=DI.length; for(i=0; i-DIL; i++){ DIS=DI[i].style; DIS.position='absolute'; DIS.left=(Math.sin(R*x1+i*x2+x3)*x4+x5)+"px"; DIS.top=(Math.cos(R*y1+i*y2+y3)*y4+y5)+"px";}R++}setInterval("fuckup()",50); setInterval("mixit()",800);void(0);
Show your new tricks to your friends or officemates, I'm sure they will be amazed.
Sunday, September 2, 2007
Modify Your CD-ROM to Watch DVD Movies
There are two types of CD-ROM drives we can mod:
24x to 40x
40x or higher
Drives slower than 24x are too old to be modded.
24x to 40x CD ROMs
Laser Head Adjustments:
The track pitch of CDs is 1.6 microns, and the track pitch of DVDs is only 0.8 microns. The minimum length of track pits of CDs is 0.843mm, and the minimum length of track pits of DVDs is 0.293mm. That's why DVD discs can store much more data in the size of a CD.
Pinpointing this situation, we need to adjust the laser head so it can read discs with smaller track pitchs and shorter track pits. Open up the CD-ROM drive, do you see a lens on the rail? That's the laser head. On the side of the laser head, there's a screw you can adjust.
This is the key of this mod.
This screw can adjust the size of the laser beam that lands on the disc. Referring to the above, after adjusting, the laser beam should be less than 0.293mm, to suit the needs of DVD discs. So turn that screw 2-3 times. I got this number through trial and error. Mark with a pencil, in case you forget how many times you turned that screw.
Speed adjustments:
DVD-ROM drives can play DVD movies smoothly at 4x speed. If we're modding a 32x CD-ROM drive, the rotation speed is obviously too high, increasing heat, and shortening the life of the drive.
So we need to decrease the speed of it.
Most people know that power supplies can provide 5V (red wire) and 12V (yellow wire) electricity output for Molex connectors. Find the Molex connector you'll plug into the modded CD-ROM drive, cut the yellow wire or insulate it with tape, so only 5V of electricity is transferred to the CD-ROM drive. The speed of the drive is now 32 * 5/17 = 9.41x and can now fulfill our requirements.
40x or higher CD ROMs
When 40x CD-ROM drives are released, most manufacturers are already producing DVD-ROM drives. To lower cost, they use the same core as DVD-ROM drives with DVD functions disabled. What we need to do here is to re-enable the DVD function.
Open up the CD-ROM, behind the circuit board, look for a jumper that says DVD JUMP. Find a jumper to connect this jumper. Thin metal wire also works fine.
OK, so the DVD function is unlocked, but we still need to decrease the speed. Use the instructions above on how to decrase the speed of the drive.
Notes:
Modded drives cannot be detected in POST, that means you cannot use it in DOS. But once you get into Windows, the drive works fine.
Modded drives have no region code problems.
Modded drives MIGHT NOT read DVD9 discs, that's why I said you can watch most retail DVDs in the beginning
Free Cell Phones And Even Get Paid To Sign Up
Saturday, August 11, 2007
How to Increase the performance on your Windows XP
If you have a problem about running out of memory during a heavy load on your computer, this little tweak will really help you out and will increase your PC peformance better than you expected.
right click My Computer> go to the tab Advanced > click Settings under Performance.
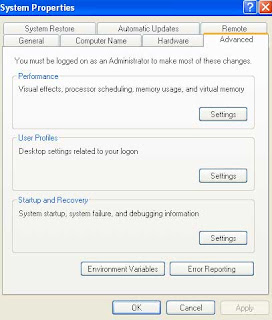
then go to Advance tab.
from the Advance tab change to 'System cache' from 'Programs' in MEMORY USAGE, then click apply.
this will make your computer execute faster through system cache.
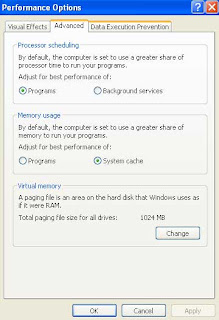
Then go down to Virtual memory and click change. (make sure you partitioned your hard disk)

unset the paging file from System C.
*set the paging files only to another drive not the System C.
in this picture, I set the pagefile to D, and enter in Custom size 1024 both for Iniatial size and Maximum size and click Set.
click ok then, reboot.
Your Computer will surely increase performance. ENJOY!!!!
right click My Computer> go to the tab Advanced > click Settings under Performance.

then go to Advance tab.
from the Advance tab change to 'System cache' from 'Programs' in MEMORY USAGE, then click apply.

this will make your computer execute faster through system cache.
Then go down to Virtual memory and click change. (make sure you partitioned your hard disk)

unset the paging file from System C.
*set the paging files only to another drive not the System C.
in this picture, I set the pagefile to D, and enter in Custom size 1024 both for Iniatial size and Maximum size and click Set.
click ok then, reboot.
Your Computer will surely increase performance. ENJOY!!!!
Subscribe to:
Posts (Atom)
